
The First Teletherapy visit: A step by step guide for therapists
It’s here, whether we like it or not! Another school year is beginning in unprecedented style. If you’re an OT, PT, or SLP starting off the year doing teletherapy, check out this post on how to structure your first teletherapy session and gain a FREE slide deck and printable to add to your therapy toolbox.

The summer was too short and back to school is right around the corner!
While I’ve been busy prepping my own boys for this upcoming school year, I’ve also been busy trying to get all my files in order for my teletherapy students.
Today, I wanted to share some of the activities I do during my first teletherapy session.
I’ve done some of these activities for the past 4 years via teletherapy and no matter the skill level or age of the child they work well to build rapport and ease those first-day jitters for both students and families/paraprofessionals.
I’ve stepped up my game this year and created this slide deck with all the activities in one place so you can use them too! Don’t forget to grab your free slide deck at the bottom of this post.
How to use the slides
Sign up below to get your free slides.
Download the pdf. Once you click on the slide deck it should automatically open in your google account.
Once the slides are in your google account:
Go to File
Make a copy
Select Entire presentation

After you make a copy, you can edit the slides to customize them for your sessions.
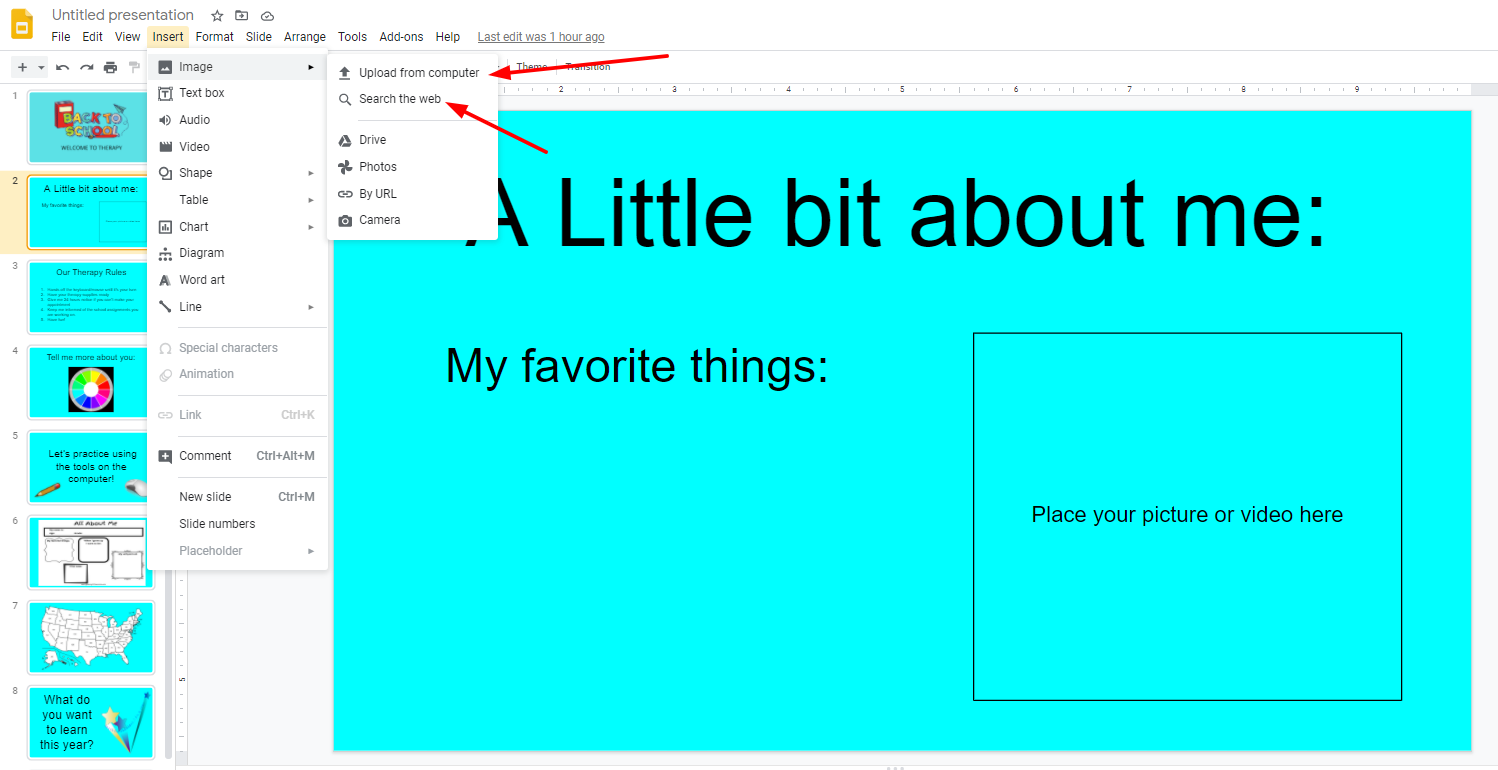
Slide 2:
Edit to include your picture or an image that represents you and add some fun facts about yourself.
To edit this slide:
Click on Insert
Click on Image
Select upload from computer or
Search the web for an image
Slide 3:
I use the US map to show the student’s where I live and then have them put a stamp where they live too! It’s always fun to see the student’s reactions when they meet me for the first time and I tell them that I live so far away from them but will be working with them all year! (Although after last year I’m sure this will be less of a shock!)
Slide 4:
I usually take some time to spell out my therapy guidelines upfront in the first session. Feel free to customize the text to include your therapy rules by clicking on the slide and changing the wording.
Slide 5:
Slide 4 is linked to wheelofnames.com. Hover over the image on the slide and then double-click the link.
It will open up the wheel of names in another tab and then you can edit the already created wheel if you’d like to add other things to get to know your students.
I like to give my student’s control to spin the wheel and then we have a conversation about their responses to the wheel prompt.
If you’re ambitious on your first session, you could have your students write some of their answers to get a little writing sample.
Slide 6:
I like to spend a portion of the first session exploring all the tools on my therapy platform. I usually include time to practice using the drawing tools and stamps. Feel free to skip this slide if you’re unable to give your student mouse control and/or whiteboard tools.
Slide 7:
Use The All About Me slide to practice using the screen share tools if you’d like a more formal activity. You could have older students type or you could type in the boxes for them. Use the drawing tool to make a self-portrait. I like to take a screenshot (I use Lightshot-a chrome extension) of my student’s work and save in an individual google folder so I have data when I’m needing to write reports later in the year. I’m also including a pdf version of this All About Me page to the slide deck if you prefer to email beforehand to your families or if you’re working face-to-face.
Slide 8:
I like to end my first session by creating goals with my student’s/families. We write them down together and put them somewhere they can see them all year!
Slide 9:
I usually let my student’s pick their favorite gif at the end of the session to end on a silly note!
To change the gif on the slide deck:
Go to giphy.com and type in what you’re looking for
Copy the GIF link
Return to your slide deck and click Insert
Click Image
Click By URL


So there you have it! First session done!
Depending on your timeframe and tech hiccups, these activities might even last you 2 sessions.
Remember, everything in teletherapy time moves slower…so slow down and have fun! It’s gonna be a wild year!
Looking for more slide decks?
Check out the Growing Little Brains shop for more ideas and slide decks that require limited to no supplies (other than screen share and good internet speed) from your students.
Don’t forget your FREE slide deck!
Grab your FREE slide deck here!
Other blog posts you may be interested in:
10 Tips to prepare students for teletherapy
5 tips to start your teletherapy school year off right
3 Teletherapy mistakes to avoid
20 OT Teletherapy games kids will love
In search of more support with your EI or preschool caseload?
Join The Therapy Village today! It’s an exclusive online membership for OT’s working in EI or preschool and want to have more support and learn new skills. Check out all the membership benefits here! Doors are only open for a limited time!